Data types
Python programming including tkinter for secondary school
Python Project
Description
New local leisure centre gave (the name of the school) school 30 free cinema tickets. Everyone, who is older than 12 and doesn't have any behaviour points on their account, can get one ticket.
When the student (older than 12 and without behaviour points) will sign in to their account, if there are some tickets left, he or she will receive a message. This message will include all the information about this offer, how many tickets left and will ask them do they want to get a ticket. In case of the positive answer, if this student doesn’t have a ticket yet, the ticket will be printed out on screen including name of this student (this information will be recorded).
Extension: teachers can nominate someone. The nominated student can get 2 tickets. To add someone to the list teachers have to sign in.
Decomposition
Key words
Our first step is to divide our project into small tasks. If we will look at the desciption you will see, that I've highlighted some words, we need to be focused on.
Database
Looking at such words as 'everyone', 'student', 'their account', we can assume that somewhere in our program we need to create a list of students. This list will contain their names (you can include different infomation for them to sign in, for example username, or you can concatenate names and surnames), their passwords (obviously, it's not something we would store in the real project), the year of their birth (again, looking at the description you can see that we will calculate their age) and behaviour points.
Input
Our second task is to give our users an opportunity to access their account (to sign in). We need them to input their names and passwords and we are going to compare this information with the names and passwords we store.
Condition
Just those, who are older than 12 will be eligible to get a ticket. We need to count their age by substructing the year of their birth from the current year. To find out current year we will use datetime module.
Monitor changes
The next task is to make sure that the number of behaviour points is not greater than 0. This task can be combined with the previous task
We need to record the number of tickets and monitor this number through the program. When you are printing a ticket to someone, you need to substruct 1 from the current number of tickets.
Output
Our last task is feeback. You are going to prnt out all the messages (welcome message, error message, extra information about the offer, imformation about their ticket) you want to send to your user.
Flowchart
Before you will start to write the actual code you are going to create a flowchart. Remember to use a parallelogram shape for inputs (username, password, answers on questions) and outputs (feedback messages), a diamond for decisions (if statements - is it true, for loops - is there any items left) and a rectangle for processes.
Program
Finally, you are ready to write your program following the rules of Python programming language. Make sure that you are adding comments, to explain your choices.
Students
Looking at the decomposition you can see that the first step is to create a list of students, where each student will be a nested list inside the main list. You can access every single student, by using the index of this student (first student - students[0]). If you will print first student print(students[0]), you will get a list of all the information about first student ['luna', 'password123', 2009, 0]. To access this information you need to include an index. For example, to access the name of first student, you can type students[0][0], the index of first student is 0 and his or her name is the first item inside ['luna', 'password123', 2009, 0] this list. To access their password, you are using index 1. A password is second item on ['luna', 'password123', 2009, 0] this list. As you see the next two items are integers. The year of their birth is an integer because we are going to calculate their age and use an arithmetic operator (-) to substract thier age from the current age. It wouldn't work with a string. The number of behaviour points is an integer as well, we will use a comparison operator (==) to compare the number of behaviour points and 0. Your students list may look like this students = [['mark', '12345', 2008, 0], ['luna', 'klu89#', 2009, 0], ['jessica', '990na', 2009, 0], ['george', 'pp77', 2010, 0], ['amelia', '788e', 2008, 0], ['josh', '889uyt', 2007, 0], ['lily', '9887w', 2009, 0], ['isabella', '778us', 2008, 0], ['hugo', '009fg', 2007, 0], ['felix', '887hgg', 2007, 0]]. Later, we will refactor this code and create four lists, instead of one.
Inputs
When you finished to create a list of imaginary students, you are ready to build sign in functionality. You need two inputs, so users can input their names and passwords. You are going to create variables for both of them, so you can reuse them. username = input('username: ')
password = input('password: ')
Python If statement
We need to compare the existing infomation and user's input. To compare them we will use if statement, but we are not going to compare just one name. We need to compare all af them, one at a time.
Python for loop
For loop will gives us an opportunity to access one name at a time. We are going to loop through every single student, focusing just on first and second items (names and passwords)for index, student in enumerate(students):if username == student[0] and password == student[1]:print(f'Hello, {username}, weclome to your account') Using enumerate function within for loop we can access the index of each student. Knowing the index of the logged in user, you can separate the next tasks. You don't have to check their age and the number of behaviour points within the same function or to add this code to the for loop.
Feedback
After every single operation you need to send a message to you users. Your output will depend on outcome of the particular operation. For example, if the name entered by user is not on your list, you will tell it to your user, using buildin print function. print('Sorry, we don't recognise this username')Add any text of your choice. When you will finish to build an interface and be ready to link it to this project, you will change print and use Label widget instead.
Conditions
In case, username is the same as the name on your list and their password is the same as well, we will check the rest of conditions. Remember, they must be older than 12, the number of behaviour points is not greater than 0 and they don't have a ticket yet.
Counting age
Our next step is to count the age of this person. We will use datetime module to find out the current year. So, current year will be a variable, but first you need to import datetime module. Add this line at the top of the page import datetime . Next step is to create a variable and name it year. today = datetime.date.today() From this number you will take away the year of their birth, accessing it by using the index of this user. When you find out their age you are going to use python if statement to compare this number and number 12. At the same time you can check this person's behaviour points, using logical operator 'and'
year = today.yearif age >= 12 and students[index][3] == 0:. If the program will evalute this conditon as 'true', you will send a message to this user, saying that he or she is eligible to get a free ticket.
Returning users
At some point you need to check another condition, maybe this user already has a ticket. You need to create an empty list and whoever confirmed that they do want this ticket, their names will be appended to this list. students_with_ticket = [] It is the way you can keep track of returning users.
If this user doesn't have a ticket yet we need another input from users. We ask users to confirm that he or she does want this ticket. If this condition is 'false', if they don't want this ticket,you can either refresh your program or before refreshing print a message with some information, school news for example. Be creative.
Tickets
As you remember, at the beginning we had 30 tickets. If your user doesn't want this ticket, or he or she is not eligible, the number of tickets will stay the same. If your user confirms that he or she does want this ticket you need to take away one from the current number of tickets. When your are printing an imaginary ticket your can include the number of tickets left, name of the user, the date (try to use datetime module) and some more information of your choice. Remember to use f string to add the value of the variable to your message and the new line character '\n'.print(f'Your message, {your_variable} \n second part of the message {another_variable} \n {todays_date}'). When you will combine this code and tkinter code, you can add an image of the ticket or style a frame widget as a ticket.
Refactoring
Read 'The Zen of Python' and use it as a guide to simplify your code.
Data
For example, at the beginning we've created the nested list, now you can separate this data and create one list for names, one for passwords, one for years and one for behaviour pointsnames = ['mark', 'luna', 'jessica', 'george', 'amelia', 'josh', 'lily', 'isabella', 'hugo', 'felix']passwords =['12345', 'klu89#', '990na', 'pp77', '788e', '889uyt', '9887w', '778us', '009fg', '887hgg']b_years = [2008, 2009, 2009, 2010, 2008, 2007, 2009, 2008, 2007, 2007]behaviour_points = [0, 0, 0, 0, 0, 0, 0, 0, 0, 0] You don't have to retype everything. Let's start with names. create an empty list names = []. Loop through every single student from your students list and append their names to the empty list. for student in students:Now you can print this list, copy and add to your code.
names.append(student[0])print(names) The same way you can create passwords list, year_of_birth list and behaviour_points list. Remember, that index will be different. If we will look at the first nested list inside your students list, you will see that first item on this list is the name. The index of the first item is always 0. The index of the next item is 1, it is a password and so on. Make sure that you are creating modular program (in our case make sure you are using functions).
Case sensitive
When you will test your program, you will see, if names are not in the same case as inputing names, your program is not working. If you don't want your inputs to be case sensitive, you need to modify your program. Before you are comparing names from your list and users input names, you need to transfer input names into the same case. You are going to use a string method (username.lower() to give your user an opportunity to enter their names in capital letters. You can create a new variable username_lower = username.lower() Now you are going to use username_lower to compare two values.
Whitespase
The same way you can remove whitespase - username.strip()). Remember it is optional, it is the way you can minimize dependencies in your program. If your users by accident will press a spacebar key, this strip method will remove it before you will compare two names and your code will work. Don't use this method for passwords.
Modular programming
In our case modular programming is to separate your code into functions. There are many benefits to keep your code organized and one of them is readability. There is no just one solution and you can create your own functions in your own way.
Functions
I've separeted my code into three functions: sign_in, count_age and get_ticket. Make sure that you pick meaningful names for your functions as well. Noramally, we use nouns for variable names and verbs for function names. Think, what problem your function will solve before you pick the name of your function. It is the first line of sign_in function, the way we are creating function def sign_in(): you just need to change the name of the function and add your block of code underneath. Remember, to run the code underneath, you need to call this function sign_in()
Parameters
When I've created count_age function I passed two parameters into this function - i and username. You can use any names form your parameters. I am using username twice. It doesn't mean that my parameter username is the actual data, I could name it u or user or pick any different name. When I will call this function I will pass two arguments - the actual data (index, username). The number of arguments must be the same as the number of parameters. def count_age(i, username):
In this example I've created multiplicate function and I passed two parameters: n1 and n2. I can call this function as many times as I need, passing different arguments every single time or using the same arguments. Second time I call multiplicate function, I passed two arguments: first_number and second_number.
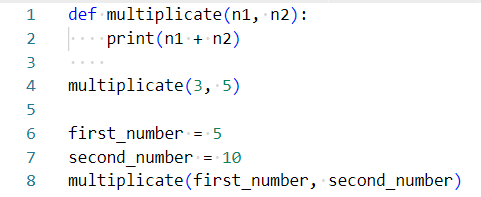
Without parameters this function wouldn't be reusable. I would have to use the existing data within this function or create new varibles to use them within this funtion. Next time to multiplicate two numbers I would be forced to create another function with different numbers, it would expand my code and I would repeat myself. As a developer you never repeat yourself and you are trying to build reusable functions.
Global and local variables
To count the age of the person who logged in I need to know the index of this user. We have four lists of names, passwords, years of birth and behaviour points. If the index of someone's name is 6, the index of the same person's password is also 6. When I know the index of logged in person I can access the rest of his or her data using this index. Running sign_in function we found out the index of logged in person. You can access this information just from log_in function, because it is not global variable. Index is a local variable in this case, after log_in function's code will be executed this variable will disappear. There are at least two solutions to use this variable as an argument for a different function. One of them is to call this function inside log_in function. You are creating count_age function globally, but calling it within log_in function, to be able to use local index variable.
Return
There is another way to use a local variable, the variable you've created or your program have created within this function. You can return this variable, using python return statement. return index To access this value you would create another variable and assign to this variable the function, calling it at the same time. users_index = log_in()
Code
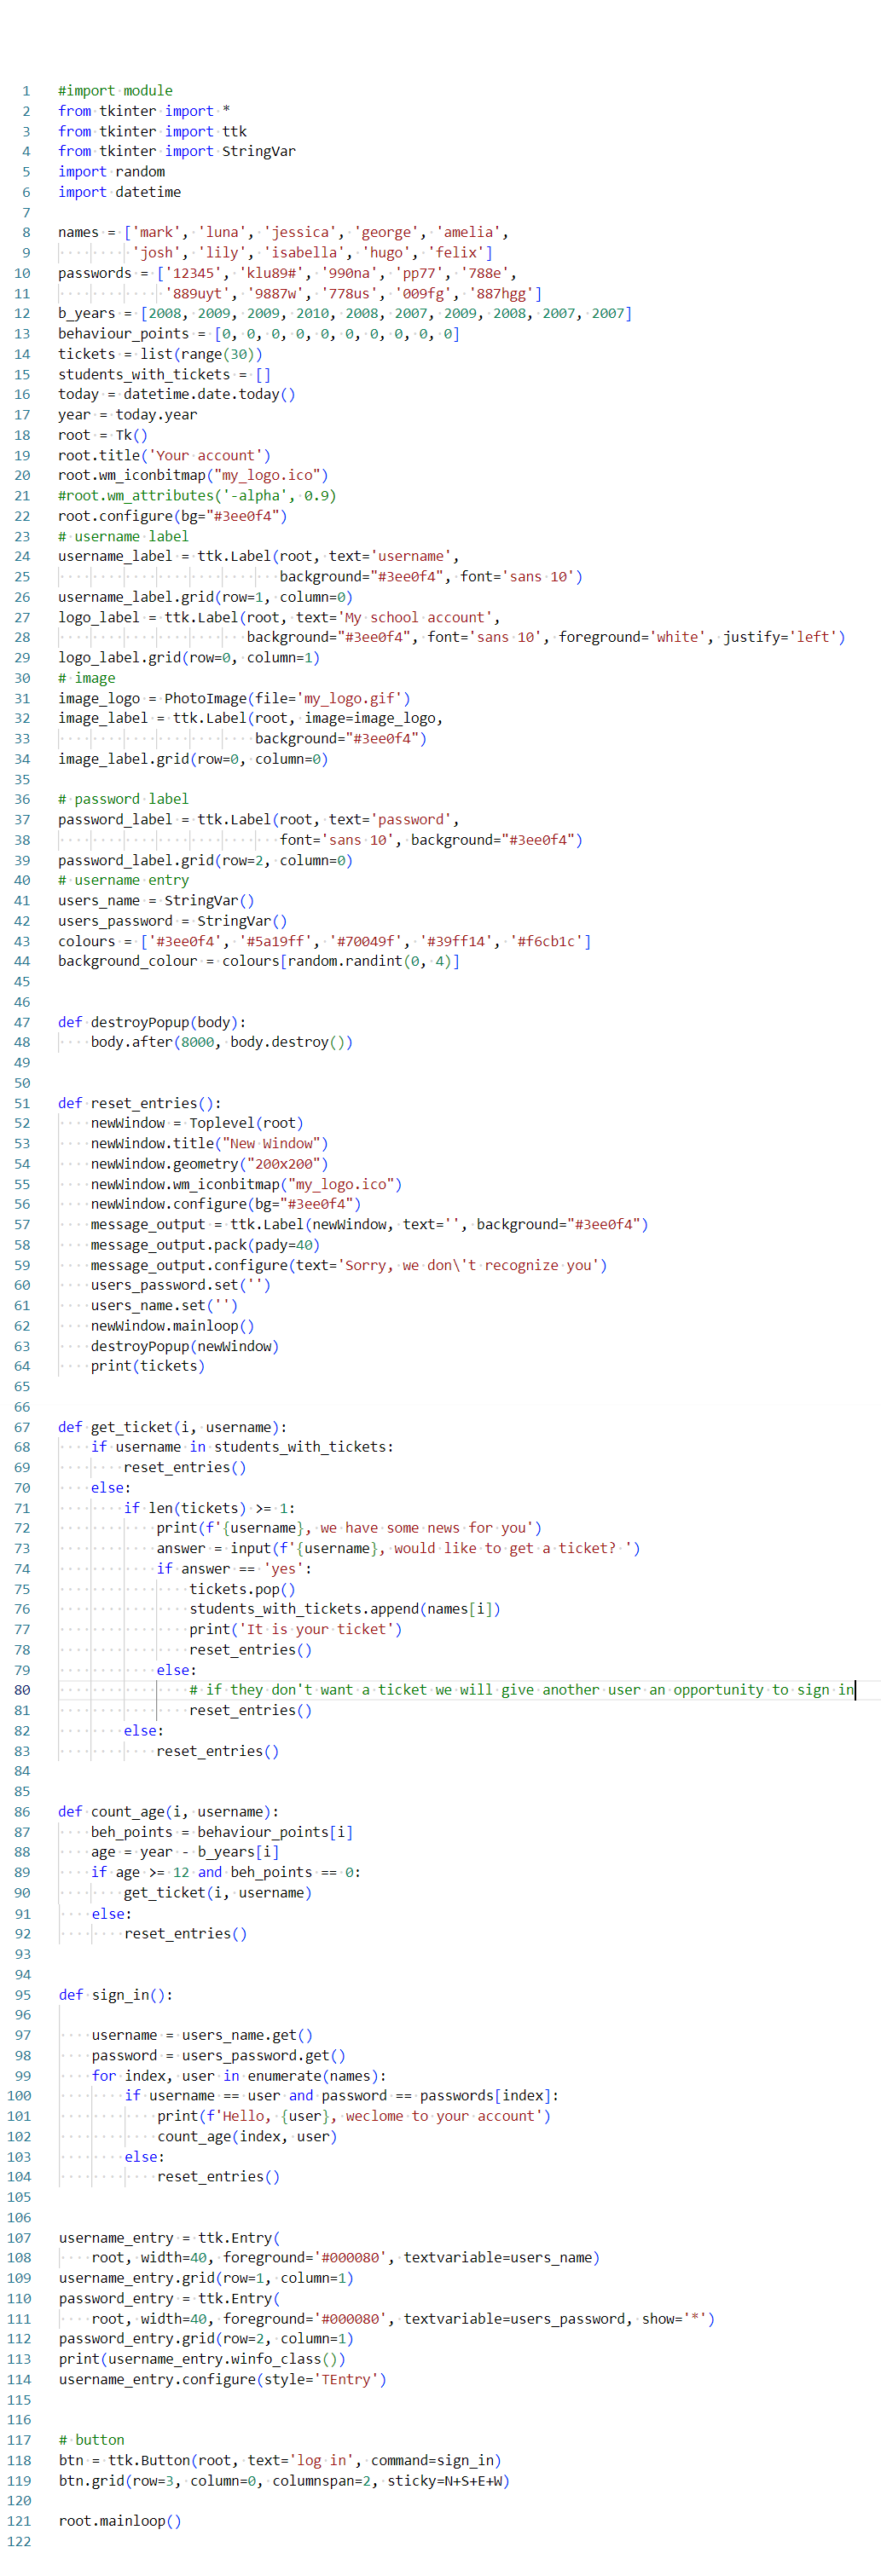
Look at the picture below, it is just one way how you can refacor you code, you can do it your own way or use this example. 
Tkinter
Graphical User interface
Now your are going to create a Graphical User interfaces (GUIs) for your program, using tkinter. You can split this task into smaller tasks: create your design, import tkinter module to your program, create a body, add widgets and change style of your interface. Once again, you are going to change your program: the buildin print function you will swap to the label widget and inputs to the entry widget.
Your first step would be to create a prototype of your interface, so you can see how it's going to look like. Pick the colours you want to use, a font and size of the text.

Tkinter module
Now you are going to add tkinter to your program. You just need to add these two linesfrom tkinter import * This symbol (*) means that you want to import everything. Try to keep all your imports at the top of the page.
from tkinter import ttk
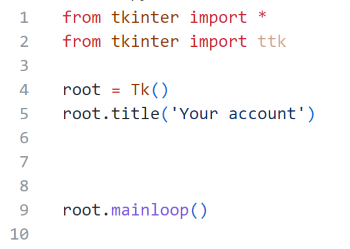
Before you are adding widgets to your interfase, you need to create its body. Just add these three lines to you code. You can change the name of the variable and you need to change the title, which will appear at the top of your GUI. Please, keep root.mainloop() as the last line of your entire code.root = Tk() .
title = root.title('Title')
root.mainloop()
You can set the size of your interface and disable the resizable property. Try to run your code without these two options and if you want your interface to have fixed size, you can do that by adding these two lines of code. Just change the actual number of pixels for the width and height. root.geometry("400x400")You can adjust this size at any time.
root.resizable(False,False)
Tkinter widgets
When you will run your code, you will see an empty grey body of the interface. Now you can add widgets. There are five widgets we are going to use: 'Frame', 'Label', 'Entry', 'Button' and 'CheckButton'.
Create tkinter widget, display tkinter widget
The steps below will show an algorighm how to create and display widgets. You just need to change the name of your widget, add the actual widget instead of (Widget), the actual parent, instead of (parent), add options you want to include instead of (options) and instead of method add the way you want to display your widget (pack, grid or place)
- Create widget: widget_name = ttk.Widget(parent, options)
- Display widget: widget_name.method(options)
You can add widgets in two steps, or you can combine these two operations widget_name = ttk.Widget(parent, options).method(options). We will keep it simple and separate them. First, you need to create a widget. To create a new widget you need to type a name (identifier) of a variable it could be anything, something, related to the content of your widget and assign a widget to this variable, including some options. Options depend on what widget you are creating.
print(name_of_widget.config())You can print available optons, using the name of the particular widget.The variable name in this example is name_of_widget. You need to change this name to the variable name of your widget. You can print these options after you've created this widget. The parent of this widget is the root. If you want to place some widgets inside the frame you've created, instead of root you are going to use this frame's name as a parent. name_of_frame = ttk.Frame(parent, padding = (5, 5, 15, 15), width=100, height = 200, relief = 'ridge') Obviously, you can change padding (the space between the content inside and the borders around this widget), width, height, relief and you don't have to include this options. You program can use defaults. Relief option could have different values: flat, raised, sunken, solid, ridge, groove.Frame - relief options
Groove

Solid

Raised

Ridge

Sunken

Flat

How to display tkinter widgets
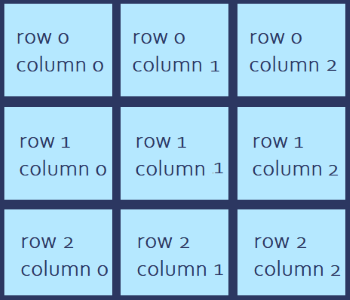
Second step is to display this new created widget. You have three choices to pick from: pack(), grid() or place(). We are going to use grid for this project, because you can control where your widget will be dispalyed. There are two arguments (row, column) and one optional (columnspan), you can set. name_of_frame.grid(row=0, column=0, columnspan=2) Columnspan tells how many columns you want to occupy. Easy steps to follow: create your new widget and display it.
Tkinter frame widget
First widget we've been looking at is a 'Frame' you can use a frame as a parent for different wedgets, visually 'Frame' is grouping widgets together, creating a box around them.
Tkinter label widget
Next widget we will create is a label. Instead of name_of_label you are typing the name of your label and instead of parent, parent of this widget (root for example or the variable name of the frame we've created). For this project you need three labels, one for the username, one for the password ond another one is an output, messages you will send to the user (welcome message, infomation about this offer, a ticket or some extra messages you want to send)
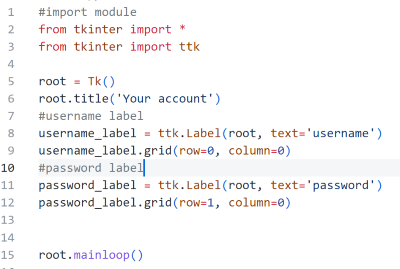
name_of_label = ttk.Label(parent, text=’username’) When you are creating this widget you need to make up an identifier (a name of the variable); you need to change 'name_of_label' to your own name of label. The same way as we've displayed the frame we are going to display this widget, using the grid method.name_of_label.grid(row=0, column=0) When you will create another label, remember to use another identifier for this variable and change the number of the row.
Image
Instead of the text you can inlude an image to your Label widget. The extensions of this image should be either gif, pgm or ppm. Before you add this image to your widget, you need to assign this variable. logo = PhotoImage(file='path') You can add an image when you are creaating this widget instead of using config. There is an opportunity to display a text and an image at the same time.
name_of_label.config(image=logo)name_of_label.config(compound='text') This option will display the image behind the text and the text in the middle of the image. There are more options you can use, for example when the image is displayed from the left side of the text. name_of_label.config(compound='left')
Tkinter entry widget
Entry widget is more complicated than the rest of the widgets, we've been looking at, simply because one of the entry's option gives us an opportunity to access the text users are inputing. Before you are creating the actual entry widget you need to create a varible, which later will be assigned to the user's input. When you are creating this variable you need to assign it to the tkinter variable.
Tkinter variables
There are four variable types you can use. input_integer = IntVar(). These variables are different from the normal python variables, the program will monitor when the value of these variables will be changed. You need to pick the type, you are expecting users to input. For this project we will use StringVar. At the top you need to add one more line, underneath imports you will import StringVar
input_string = StringVar()
input_boolean = BooleanVar()
input_float = DoubleVar()from tkinter import StringVar
Widgets in two steps; create widget and display widget
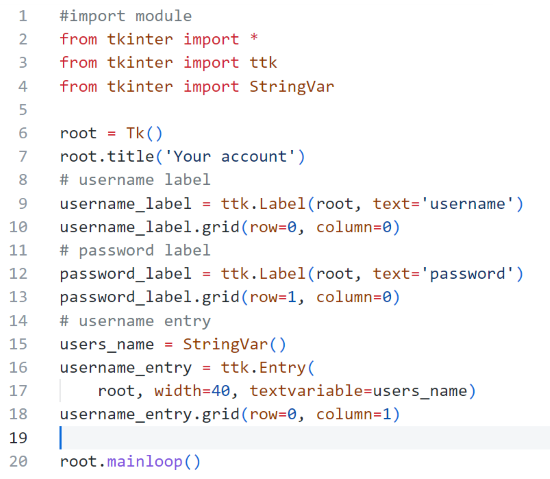
To create an entry widget you are going to follow the same steps. name_of_entry = ttk.Entry(parent, width = 30, textvariable=input_string) width in this case is a number of characters, but it is optional. Now you can display your entry widget name_of_entry name_of_entry. grid(row=0, column=1). Looking at the picture you can see that I've created just one entry for the username, you need one more for the password.
How to access the value of entry widget
The way you can get or modify the value of this (input_string) variable is - input_string.get()input_string.set('New value').
Extra option for passwords
When you are using Entry to enter a password you can hide the text someone is typing by adding show option name_of_entry.config(show = ‘*’) using config, or adding show option when you are creating this widget passwd = ttk.Entry(parent, textvariable=password, show="*").
Tkinter button widget
Before you are adding a button widget, you need to create python function. You need to write a block of code you want to run when your user will click the button. For this project, when someone click the button you want to compare the name and password they entered with the name and password on your list. Now you are ready to create a button widget. We will follow the same steps: create a widget, display this widget. It is the way we are creating a button widget - name_of_button = ttk.Button(parent, text ="Your text", command = name_of_function), to display it you are using a grid method. You may use a columnspan option, to occupy two columns if you are going to place the button underneath label widgets and entry widgets name_of_button.grid(row =2, column= 0, columnspan=2). Please make sure that you pick your own variable names. When you see name_of_label or name_of_something, I am expecting you to change this identifier (name of the variable) to your own.
CheckButton
The last widget we are going to use in this project is the CheckButton. To add it to your code, you just need to create it and display it. name_of_check_button = ttk.Checkbutton(parent, text = ‘your text’). CheckButton can store the value. Remember, there are four variable classes you can use to track changes: BooleanVar, DourbleVar, IntVar, StringVar. The rest of functionality is the same as for a regular Button. We want users to check the button if they do want a ticket and output will be depend on their answer.
Style and some more
When you've managed to add all the widgets you can spend some time to change your style. Look at your prototype you've created and try to reproduce it, using the same colours, the same fonts, and the same sizes.
Favicon
We start from the icon at the top of the interface. You need to add just one line to your code. The extension of the picture you are going to use must be ico. There are many online converters you can use to convert your pictrue. root.wm_iconbitmap('my_logo.ico')
Background of your interface
To change the background of the whole interface, you need to change the background of each widget separately. You can either write the name of the colour or use hex code of the particular colour.root.configure(bg='#3ee0f4') As you see, there are two ways to change the background of the widget. You can add the background option when you are creating this widget, or use configure functionality. Please make sure you changed the names of the variables I used to your own and instead of parent you are typing the actual parent of this widget. You even can use many colours one at a time, by creating a list with different colours and assigning, as a colour of the widget and the body of your interface, one item of this list using a random index. Remember to import random first, adding this line at the top of your program.
name_of_label = ttk.Label(parent, text='Your text', background = '#3ee0f4')
name_of_another_label.configure(bg='#3ee0f4')import randomThe numbers between brackets depend on the length of the list. The same way you can assign the colour for all the widgets and the body of your interface. If you want to change the colour of the entry widget and yo can't change it, instead of ttk.Entry use Entry.
colours = ['#3ee0f4', '#5a19ff', '#39ff14', '#f6cb1c']
background_colour= colours[random.randint(0, 4)]
name_of_widget.configure(background=background_colour)
another_widget.configure(background=background_colour)
Font
To change the font of the text you can just add font option when you are creating a new widget or add this option later using configure name_of_label = ttk.Label(parent, text='Your text', font='sans 15 bold')
Style
There is different way to add the options we'be been talking about. You can create a new style class and assign to this class some values for options you want to use. Creating a new widget you can add a style option and assign the name of the class. my_style = ttk.Style()To see all the builtin classes you can print them
my_style.configure('Class Name', font=('Helvetica', 18, 'bold'), foreground='white')
name_of_widget = ttk.Widget(parent, style='Class Name')name_of_label.winfo_class()You also can create your own.
Free ticket + Tkinter
Now we are going to link these two programs. Please create a new file and paste both programs. Now you are ready to modify them. At the top we will keep all the imports: tkinter, ttk, datetime. Next, we will add all the lists: names, passwords, year_or_birth, behaviour_points, tickets, and an empty list for users_with_tickets. You can change the identifiers and use your own. Now you are going to add two varibles, to be able to count their age: one is today and another one is a year. Without any changes you can add your tkinter program underneath these variables. The last line of your program will be root.mainloop(), always keep it at the bottom. As you see there is no changes so far.
Inputs
To make your sign_in python function work, we need to modify it. You've created two entry widgets, for users to enter their names and passwords. You are going to remove inputs and related variables from your program. When you will compare the names users entered and the names from your list to control your program, you are going to use the variables you've created for entry widgets, the same will work for the passwords. To get the value of these variables you will use get method. So, you can save these values, creating new variables. If you don't want their usernames being case sensitive, you can convert entered username to lower case using lower() method. username = users_name.get() Now you can loop though every single name using python for loop.
password = users_password.get()for index, user in enumerate(names): Remember about indentation, four spaces by default. If you want to keep a nested list this code will be slightly different for you. if username == name and password == passwords[index]:
You are going to change your sign_in function, the function you've been using for the button widget as a value of the command option (command=function_name). It is how your button widget looks like, and as always just two lines. One to create widget and one to display.btn = ttk.Button(root, text='log in', command=sign_in)
btn.grid(row=2, column=0, columnspan=2)
Outputs
To send your user some messages we've been using built in print function. Instead of print, now we are going to use a label widget. You have three options: either overwrite the text of the label widget, use many label widgets (one for each message) or create a new window and place your label there. I picked two of them, so you can compare them and choose which option you are going to use for your python program.
Reset function
We are running this function in many cases if your user: entered the wrong user name, entered the wrong password, he or she is younger then 12, has behaviour points, doesn't want a ticket, already has a ticket and after you are printing the ticket. There are couple of values you need to change. First of all you need to change the value of inputs (value of the entry widgets variables) to an empty string and we are using set method to do that. In my case I've created a new window to pass a message to the user. Message could be an argument for reset function. As I mentioned there could be many reasons to reset your program and call reset function, so can pass different message accordingly.
Interface

Logged in user

Code
Books about Python
If Python and tkinter seem a bit puzzling right now, don't worry! There are fantastic books waiting just for you that can make everything clear and super fun. These magical books are like treasure maps, guiding you through the exciting lands of coding and helping you create amazing things with Python and tkinter. Get ready to turn confusion into curiosity and become a coding champion! Happy exploring! .